Tuesday, December 20, 2011

Crayon Letter Wall Hanging

This year for Christmas Ashtyn really wanted to make her own gift for her teacher, Mrs. Johnson. We saw this idea and she LOVED it! So we decided to give it a try! Here's what we did.

Material Needed:
Frame (without the glass)
Spray Paint (if wanted- we spray painted the frame and the matting to match)
Crayons
Glue Gun & Glue Sticks

What To Do:
1. Spray paint your frame
2. Align the crayons the way you would like them (it helps to lay them out first to make sure you have enough room)
3. Use your hot glue gun to glue each crayon individually (you don't need a lot of glue but make sure to glue each crayon)

And wallah! You're done, so incredibly easy and I had everything on had to make it :)
Enjoy!

The finished Project! A "J" for Ashtyn's teacher :)

Monday, December 19, 2011

Hot Cocoa Bags

Ashtyn made these yummy hot cocoa bags for her Kindergarden class for a little Christmas Gift. They were a big hit and VERY easy to make!! Here is what we did!

The finished Product with a little Oopsie Daisy Flower attached :) 
Items Needed:
  • 12'' Disposable Decorating Bags
  • Hot Cocoa Mix (we used the large container of Nesquik from Walmart)
  • Mini Marshmallows
  • Mini Chocolate Chips
  • 1 Tbs Measuring Cups
  • Name Tags
  • Glass
  • Ribbon
  • Scissors

1. Put 1 Disposable Bag a Tall Glass
2. Pour 5 TBS of Cocoa Mix into the bag
3. Next put 10-15 mini marshmallows on top of the cocoa mix
4. Put 1 tbs of Mini Chocolate Chips on the top
5. Cut a piece of ribbon and tie around the top
6. Label your cocoa bags with to: and from:

So simple and easy! Hope you enjoy!
Love,
Heather & Ashtyn

Tuesday, December 13, 2011

52 Reason Why I Love You

My hubby's birthday was coming up and I always like to make something for him just to let him know how much he means to me and the kids. This year was a hard year for us with a lot of unexpected events happening. We spent a LOT of time in the hosptial (Avera McKennan, in Sioux Falls, SD and Children's Hospital, in St. Paul, MN) due to pre-term labor then a premature baby! 
We spent a lot of our hospital time together playing cards so 
I thought this gift would be perfect gift for him!
The longest part was to come up with 52 reasons! hehe.

Materials Needed:
Deck of Cards
Mod Podge
Paint Brush
Newspaper (to advoid spilling all over table)!
Scissors
Craft Paper or Scrapbooking Paper
Hole Punch
2'' Ring
  • 1st- I typed up my "52 reasons" then printed and cut them out
  • 2nd- I cut out craft paper .5'' bigger than the "reasons"
  • 3rd- I painted Mod Podge on the Card, then attached the craft paper, put another layer or Mod Podge on the Craft Paper, Placed the "reaons" on there and finally did a FINAL COAT of mod podge on the entire card
  • 4th- Place the cards on newspaper and let them dry (allow up to 30 min to competely dry)
  • 5th- Punch hole's in the top left hand corner
  • 6th- Attach all cards together with a ring


Monday, December 12, 2011

Little Guys Neck Ties


Here are 4 matching Christmas ties for the cutest family of 4 boys! It makes it so much fun to make knowing the are going on such handsome and sweet boys!! :)
Sending a little holiday cheer!
Photobucket

Monday, December 5, 2011

My Wish List for Santa

The kids have been talking all year about what they would just LOVE to get for Christmas! We usually write down the list of things they'll talk about for the year and save them for Christmas but I saw this a few months ago and thought what an awesome idea! I can save these each each and when they are older they can look back for years and see what they had "wished" for!
It was so easy to make and the kids had a lot of fun helping make them!


MATERIALS NEEDED:
Wooden Spools (I bought a pack of 8 from JoAnn Fabrics, you can also find them at Hobby Lobby)
Spray Paint
Paper
Permanent Marker
Glue
Ribbon
Scissors


WHAT TO DO:
1. Spray paint the Wooden Spools to the color you would like
2. Cut out the paper to fit the length of the spool
3. Write the "wish list" onto the paper
4. Glue the top of the paper onto the spool and then wrap it around
    *I also put a little dab of glue onto to spool after I wrapped the paper around 1 full time
5. Cut ribbon and tie at the top
6. Label with a piece of paper the name of the child and the year


SO Easy, YOU'LL LOVE THEM! :)


Friday, December 2, 2011

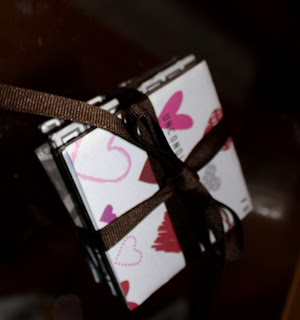
Decorative Tiles

The kids and I really enjoy making these decorative tiles, they can be used for coasters
or you can hang them on the wall or use a clothes pin and some wood glue and they can be set up anywhere!
They are so cute, easy and very affordable to make!
Ashtyn and I made a few sets for gifts this year, here's what we did!

Supplies:
Tiles (We got ours from Menard's, you can buy them from any hardware/home store)
Scrapbook Paper
Paper Cutter (Rotary Cutter, scissors)
Ruler
Mod Podge
Paint Brush
*Gems/Ribbon, ect. Ashtyn likes to decorate hers a little more than just the paper :)

WHAT TO DO:
1. Cut out your scrapbook paper to fit the tiles
2. Put a THIN layer of Mod Podge on the tile
(note-- make sure to not use to much or your paper will bubble)
3. Place the scrapbook paper onto the tile rub it until smooth
4. Place a layer of Mod Podge over the entire title.
5. Let dry (if wanted you can decorate with gems/ribbons/ect.
6. Repeat with another layer of Mod Podge
7. Let dry for 30 min.

A few of Ashtyn's finished tiles

Titles that we bought from Menard's

I have found using a roatary cutter and large ruler is the quickest and easist way to do this!

Paint on the mod podge then add your paper, then paint another layer of mod podge!

Press down the paper, get out all those bubbles!


Woala! Finished products! GREAT GIFTS :)

Saturday, November 19, 2011

Taste and See Extravaganza

We headed to Granite Falls, MN to Prairie's Edge Casino's Craft Show! It was an awesome turnout until about noon when the 1st snowfall of the season happened.. and oh man did it snow! But we were very lucky to have such an awesome turn out in the morning and I got to sit by some pretty awesome ladies!

I am very excited about my new flower stand that my hubby built for me the night before (it's about to get a new paint job soon)! But I love it, it was so easy to hold the flower clips!
My new Flower Clip Display!
Peg Board and Pegs bought from Menards, screw a few 2 x 4's in the back and whola it works amazing! Just needs a little bit of paint!

Our booth set up!
Some new flowers we made!
Just some Oopsie Daisy's
Photobucket

Sunday, October 2, 2011

Volcano Fun!

 
Today we made this fun volcano at Children's Church!
It seemed fitting for the kids as we're finishing up the story of creation so I brought a volcano and we talked about how God created the volcano too, the kids (all 11 of them) LOVED watching what happens when you pour in the vinegar! What a fun experiment.
Printable Version 
ITEMS NEEDED:

6 cups flour
2 cups salt
4 tablespoons cooking oil
warm water
plastic soda bottle
dish washing detergent
food coloring
vinegar
baking dish or other pan
2 T baking soda
*First make the 'cone' of the baking soda volcano. Mix 6 cups flour, 2 cups salt, 4 tablespoons cooking oil, and 2 cups of water. The resulting mixture should be smooth and firm (more water may be added if needed).
*Stand the soda bottle in the baking pan and mold the dough around it into a volcano shape. Don't cover the hole or drop dough into it.
*Fill the bottle most of the way full with warm water and a bit of red food color (can be done before sculpting if you don't take so long that the water gets cold).
*Add 6 drops of detergent to the bottle contents. The detergent helps trap the bubbles produced by the reaction so you get better lava.
*Add 2 tablespoons baking soda to the liquid.
*Slowly pour vinegar into the bottle. Watch out - eruption time!
The volcano erupting!!! So much fun!

Photobucket

Thursday, September 15, 2011

Chicken Wire Frames

I was inspired by my friend who made one of these so we made a few of them! They are so fun to have to hang cards on or little love notes, ect.

Materials Needed:
Frame (remove glass and matting)
Chicken Wire
Wire Cutter
Staple Gun
Hot Glue Gun
Mini Clothes Pins
Buttons (you can use embellishments or spray paint on the clothes pins) -optional
Gems (optional)

What To Do:
*Spray Paint Frame -optional-
*Measure and cut the chicken wire (or wire mesh) to fit the back of the frame
*Staple to frame
*Using the hot glue gun glue the gems to the buttons, then glue the buttons to the end of the clothes pins.

Finished Product :) Could use spray paint on the frame if you would want to!