Showing posts with label Projects. Show all posts

Wednesday, September 19, 2012

the Thankful Tree

Brayden and I have been working on the letter L this week. I saw something similar to this on pintrest and loved it. (This was also on my fall bucket list, yahoo for checking it off)!
While we were in Marshall shopping I picked up this cute vase at Walmart for $5.00.
I also borrowed the cute scallop punches then Brayden and I went out and collected a bunch of sticks in a grove behind our house. We got home and Brayden helped me punch holes in the "leafs" and arrange the sticks in the vase.
The Thankful Tree
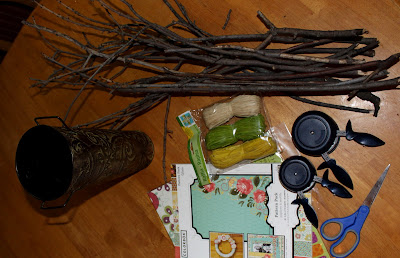
Sticks, vase, scrapbooking paper, twine (we ended up not using it but it was to tie the leafs' on the tree) scallop punch, scissors and hole punch

 
 I explained to him what this tree meant and what it was for. We each wrote 3 things we were thankful for on the leaf. Then he hung the leafs' on the tree.

What are you thankful for?

Hanging up the leaf on the tree

 
When Ashtyn got home he couldn't wait to tell her about it. He calls it the "Thank You Tree" she thought this was pretty awesome too! She wrote a few of her own down on the leafs' and hung them on the tree then went out to play. Not long later a few of the neighbor friends came in with her. Went straight to the counter that the tree was on and they were writing things they were thankful for and hanging them on the tree. My heart was filled with so much joy. What an awesome ministry this has become. Ashtyn was sharing Jesus with them and they were so excited about it!

We have had this tree for a few weeks now and it has been so fun to watch the kids write on the leafs'. The first few days I would ask them during dinner what they were thankful for and then it became a habit. We will be playing or crafting and they will say, Oh I have something to write on a leaf! It's amazing. God is so good and it is so wonderful to see that joy in their hearts too.
This has been the most rewarding project we have done together.
 
Photobucket

Friday, September 7, 2012

Ice Cube Paint

We accidentally found a new favorite project... ICE CUBE PAINTING!

Katie and Brayden were painting, I left them alone for just minutes and came back to find this...
They took it upon themselves to get more paint which spilled EVERYWHERE. I mean EVERYWHERE, yes all over them, the chairs and the floor.
 
After I got them cleaned up they headed outside to play while I figured out what to do with this mess.
I left the paint in the ice cube tray because there was SO much in there and had to show Ashtyn when she got home from school (and to show my hubby who didn't believe me when I texted him about this big mess).
Ashtyn got home and thought this was the COOLEST thing EVER. Within a second of looking at the mess she said, "mom put it in the freezer"! What an awesome idea! In the freezer went the tray of paint.
The next day, here is what our kitchen looked like :)
SUPER SUPER FUN!
 
*The next time we do this, I will be the one pouring the paint into the ice cube tray! It also works a little better if you spray a little PAM on the tray!


Photobucket

Monday, August 27, 2012

Chalkboard Frame

 
I finally got one of my projects checked off my list...the chalkboard frame.
This was a lot of fun to make, quick and easy!
Items Needed: 
*FRAME -I purchased the large frame at a
Thrift Store for $2.50
*CHALKBOARD SPRAY PAINT
- Purchased at Menard's (Rust-oleum brand) for $3.90
*SPRAY PAINT- For the frame, purchased at Walmart (Krylon Brand) for $3.84 
 
What To Do:
*Take the back off the frame and remove the glass
*Using the chalkboard paint-spray the wood back
*Spray paint the wooden frame whatever color you choose
(The chalkboard paint dries very quickly, do at least 2 coats and then let dry)
- I also had plenty of spray paint left so I could do another frame! :)
 
And there you go! A super cute inexpensive chalkboard frame for $10.25


Photobucket