Showing posts with label Kids. Show all posts

Tuesday, May 8, 2012

Daisy and Her Babies

I FINALLY got the rest of the Tab "Daisy and her Babies" a little updated! So here you go! :)
This summer on 8.8.11 Daisy had her 1st litter of pups 11 of them (unplanned by us). So it was a big suprise, we did lots of research and being a stay at home mommy and wanting to teach the kids some major responsablity we took extereme care of the pups. I kept track of their growth and what we did with them daily, lots of blogging..along with taking HUNDRES of pictures! To view their development click HERE!
I also finally uploaded a little video we got of the puppy birth! :)
Click HERE to watch it! :)
They were such a joy to all of us. We had so much fun caring for and raising these pups!
We are very happy to report that ALL the puppys went to wonderful homes, most in MN but 1 puppy (Ashtyn's favorite who she called 'Princess') went all the way to Washington!
There are a few puppys that are living locally, it is so much fun for us to be able to go see them.
We would LOVE any pictures or updates of the pups from Daisy's 1st litter if you have them :)
You can email them to Heather
Ashtyn with Momma Daisy and 10 of her pups, this picture was taken
just MINUTES before she had her last pup with Ashtyn sitting right next to her!

Monday, May 7, 2012

Marble Run

I attended a child care conference in Sioux Falls this past weekend and got SO MANY aweseome ideas of things to do and make with the kiddos! So of course as soon as I got home I had to try one of the awesome ideas from Jeff Johnson... the MARBLE RUN!
It can be done indoors or outdoors, we chose to do it outdoors (only because thats the only place you will ever find our kiddos)!
It is so inexpensive, SO EASY and so much fun!
My only advice is to let the kids help you build it, or give them tape and let them build and and invent the way they want to make the run themselves (they will amaze you with what they come up with)!

WHAT YOU NEED:
*Pool Noodles (buy @ the dollar tree)
*Tape (Duct Tape works the best but can use packaging tape as well)
*Knife
*Marbles (I bought ours at Hobby Lobby in a bag of 25 for $1.99)


HOW TO MAKE IT:
*Cut the Pool noodle in half the long way (you can also cut the noodle the short way to make tunnels, ect.)
*Use tape and tape the cut pool noodles together --> then tape the noodles to the steps or whenever you want to make your marble run
*Then let the kiddos play!!

Pool Noodle, Marbles and the top of the noodle cut off!

Make little tunnels by cutting off the top of the noodle

Cut the noodle in half

Tape the ends together

Tape down the noodles!

Let them play, figure it out and invent what to do with it!

And let them fix it!!! They will Be SOOO Excited when they figure out how to make it work on their own!

The exitment of figuring out how to fix it! :)

ENJOY!! :)

Photobucket

Friday, April 6, 2012

Resurrection Eggs- The Real Story of Easter!


We LOVE to celebrate Easter! But with all the culture celebrations, eggs, the bunny and candy it becomes confusing to children. I wanted to teach my children the REAL meaning of Easter and when they were asking to do an Easter Egg hunt this seemed like the best way possible.
WHAT YOU NEED:
*Egg Carton
*Plastic Eggs
*Items listed in eggs:
  -Palm Brach or blade of grass
  -Cotton ball with perfume on it
  -Cracker
  - Three Dimes
  - Thorny branch (crown of thorns)
  -Toothpick (cut and glue into the cross)
  -Nail or push pin
  -Dice
  -A q-tip
  -Few whole cloves
  -Small Rock
 *Scissors
*Hot Glue Gun

ASSEMBLE
Egg #1 -Palm Brach (or blade of grass, leaf)
Msg: Jesus rode into Jerusalem on a donkey. The people that loved Jesus waved palm branches
Passage: Matthew 21: 1-11
 
Egg #2 Cotton ball with perfume on it
Msg:  Mary poured expensive perfume on Jesus' feet
Passage: John 12:2-8
Egg #3 Cracker- a small cracker to represent the pass over bread
Msg: Jesus ate the Last supper with his friends His Disciples
Passage: Matthew 26: 17-19
Egg #4 Three Dimes
Msg: Judas betrayed Jesus for 30 pieces of silver
Passage:  Matthew 26: 14-15
Egg #5 Crown of thorns. A small thorny branch or a single large thorn
Msg: Soldiers placed a crown of thorns on Jesus' head.
Passage: John 19:2
Egg #6 Cross made from a toothpick
Msg: Jesus carried his cross that he died on
Passage: John 19:17
Egg # 7 Nail or Push Pin
Msg: Jesus was nailed to a cross and pierced in His Side.
Passage: John 19: 18, 34
Egg #8 Dice
Msg: Soldiers parted Jesus' garments and cast lots for His coat.
Passage: John 19:24
Egg #9 A q-tip
Msg: They gave Jesus vinegar mixed with gall on a sponge to drink
 Passage: John 19:29-30
Egg #10 A few whole cloves
Msg: Spices to prepare Jesus for burial.
Passage:  John 19:40
Egg #11 A small rock
Msg: The stone covering Jesus' tomb was rolled away
Passage: John 20:1
Egg #12 NOTHING.
Msg: The tomb is empty . He has risen!
Passage: Luke 24: 6-7
We first read the Easter story before looking at the eggs. Our children are young (6, 3 and 16 months). It really helps if they have the story fresh in their minds! Then we hid the eggs, the kids found them and put them in order 1-12.

They opened the eggs and remembered the parts of the story!! They were SO excited that they could relate to the Easter Story with the items in their eggs.

It just filled my heart with joy watching them and seeing how they remember what we read and even the last egg.. that was empty (I wasn't sure how they would react.. but they were SOOOO EXCITED and they figured it out right away that it was empty because Jesus rose from the dead and went into Heaven for us!!!)

Also you can print bible verses and place them inside each egg, our daughter who is 6 was able to understand but the younger 2 aren't quite there yet so they enjoyed looking inside the eggs and listening to the story! :)

We have hid the eggs and told the story so many times this week in preparation for Easter and it is so awesome to watch the kids be able to tell each other the real meaning of Easter!

I also found a few other neat ideas on Finding Easter in Bunnies and Eggs here!

We hope you enjoy this as much as our family has! :)
Photobucket

Tuesday, January 17, 2012

Making some Daisies

Ashtyn had the day off of school for "In Service". I just treasure my time with her. So she got to pick our agenda for the day, with a little help from her brother of course! After we finished breakfast we all headed right upstairs to make some flowers! She wanted to make a bunch for her friends that are coming to her birthday party (she turns 6 on Friday, where has the time gone)!
We made lots and lots of flowers. I just cherish those moments, we sing and talk and giggle away the entire time. The boys also had a fun time using our table as their machine shed and they parked their John Deere Tractors underneath and played their usual.. farmin and cowboys!
I'm so thankful for this little business that we have started and feel so incredibly blessed to be able to stay at home with all 3 of my children each day!


Ashtyn and her favorite flower that she created :)

Ashtyn's little flower display of her favorites that she made from the day :)
Photobucket

Friday, January 13, 2012

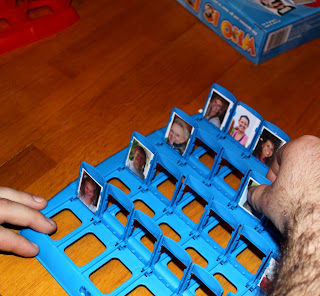
Personalized Guess Who Game

 A family favorite of ours is to play games, we recently bought the kids this Guess Who Game and wanted to be able to play with both Ashtyn (5) and Brayden (3). It was harder for Brayden to play since he didn't know the names of anyone on the cards. We made our own personalized game and it has been his FAVORITE game to play ever since then! It was really easy to make, a little time consuming but definitely worth it for all the hours that we have now spent playing it! :)
Hope you all have a super fun time playing this!

Materials Needed:
Pictures (I cropped each picture 1'' by 2'' --> then printed them)
Mod Podge
Paint Brush


What To Do:
After printing the pictures and cutting them out --> You will need 3 copies of the pictures (2 for each board and then 1 set to draw from)
Just use a layer of Mod Podge on the original card then put your picture onto card if you would like you can put an additional layer of Mod Podge over the top! :)

Brayden playing our new personalized Guess Who :)
Sorting the cards and getting ready to apply Mod Podge

Setting the cards up

It's still very easy to play the game you just need to come up with a few more creative questions! Such as;
  • Is it a boy?
  • Are they older than 10 years old?
  • Do they have glasses on?
  • Do they have a flower in their hair?
  • Is a grandma?
  • Is it my uncle?
  • Do they have a white shirt on?
  • Do they have a tanktop on?

Monday, December 5, 2011

My Wish List for Santa

The kids have been talking all year about what they would just LOVE to get for Christmas! We usually write down the list of things they'll talk about for the year and save them for Christmas but I saw this a few months ago and thought what an awesome idea! I can save these each each and when they are older they can look back for years and see what they had "wished" for!
It was so easy to make and the kids had a lot of fun helping make them!


MATERIALS NEEDED:
Wooden Spools (I bought a pack of 8 from JoAnn Fabrics, you can also find them at Hobby Lobby)
Spray Paint
Paper
Permanent Marker
Glue
Ribbon
Scissors


WHAT TO DO:
1. Spray paint the Wooden Spools to the color you would like
2. Cut out the paper to fit the length of the spool
3. Write the "wish list" onto the paper
4. Glue the top of the paper onto the spool and then wrap it around
    *I also put a little dab of glue onto to spool after I wrapped the paper around 1 full time
5. Cut ribbon and tie at the top
6. Label with a piece of paper the name of the child and the year


SO Easy, YOU'LL LOVE THEM! :)


Sunday, October 2, 2011

Volcano Fun!

 
Today we made this fun volcano at Children's Church!
It seemed fitting for the kids as we're finishing up the story of creation so I brought a volcano and we talked about how God created the volcano too, the kids (all 11 of them) LOVED watching what happens when you pour in the vinegar! What a fun experiment.
Printable Version 
ITEMS NEEDED:

6 cups flour
2 cups salt
4 tablespoons cooking oil
warm water
plastic soda bottle
dish washing detergent
food coloring
vinegar
baking dish or other pan
2 T baking soda
*First make the 'cone' of the baking soda volcano. Mix 6 cups flour, 2 cups salt, 4 tablespoons cooking oil, and 2 cups of water. The resulting mixture should be smooth and firm (more water may be added if needed).
*Stand the soda bottle in the baking pan and mold the dough around it into a volcano shape. Don't cover the hole or drop dough into it.
*Fill the bottle most of the way full with warm water and a bit of red food color (can be done before sculpting if you don't take so long that the water gets cold).
*Add 6 drops of detergent to the bottle contents. The detergent helps trap the bubbles produced by the reaction so you get better lava.
*Add 2 tablespoons baking soda to the liquid.
*Slowly pour vinegar into the bottle. Watch out - eruption time!
The volcano erupting!!! So much fun!

Photobucket