Wednesday, September 26, 2012

Canning Pears

Another new thing for us...(we had lots this past week..) We canned Pears!!! And when I saw we, I mean WE! Me, Ashtyn and Brayden! And for the future I will never do this without them! They were AMAZING, they were such a huge help to me. After me telling them 10 times that I would let them help me next time I finally gave in and let them help me peel pears. I thought them both how and after a few pears I stopped peeling and started cutting! They were whipping right through them it was so awesome doing this together. We talked and laughed and had a great time!
Here is how we did it!
 
This was such an awesome experience to do with the kids we had so much fun and we all learned so much. I can't wait to do this again.
 
Oh and a little update: The next day Brayden had some of our pears for lunch he looked and me and said, "Mommy these are better than the Pizza Ranch pears"! <--Just an FYI Pizza Ranch pears used to be his favorite!
 
Photobucket

Thursday, September 20, 2012

Letter L

A few people have asked for some ideas using the alphabet relating to the homeschooling I have done with Bradyen. So here is a post. I will post some of the things we do with each letter each week  :)


Letter L
*Find the L Magnet - listen to the sound (on the magnetic leap frog)
*Air trace
*Trace the letter on white board
*Write the letter
*Cut out L with playdoh

Things we did
1. Bible Story: Lazarus & Jesus Loves the Children
     - color the bible story picture
2. ABC Book Letter L- Find things that begin with L and glue them in. Also write down the words that he remembers that begin with L
3. Laugh Lots
4. Go to the Library
5. Write a Letter to someone special & mail it :)
6. Jump in Leaves
7. Make a Leaf maze
8. Do the Limbo
9. Lawn bowling (we did this with pumpkins and toilet paper)
10. Play with Legos
11. L Maze use a marker, dot marker, or sticker for this :)
12. Make Leaf Sugar Cookies

Crafts:
Leaf Art - using Metallic Markers
Leaf Threading
Leaf shaving cream painting
Make Leafs for the Thankful Tree

Food & Drink:
Lasagna
Lollipop
Lemons
Linguine Pasta
Limes
Lemonade- it was so much fun watching as he made his own lemonade :)


Wednesday, September 19, 2012

the Thankful Tree

Brayden and I have been working on the letter L this week. I saw something similar to this on pintrest and loved it. (This was also on my fall bucket list, yahoo for checking it off)!
While we were in Marshall shopping I picked up this cute vase at Walmart for $5.00.
I also borrowed the cute scallop punches then Brayden and I went out and collected a bunch of sticks in a grove behind our house. We got home and Brayden helped me punch holes in the "leafs" and arrange the sticks in the vase.
The Thankful Tree
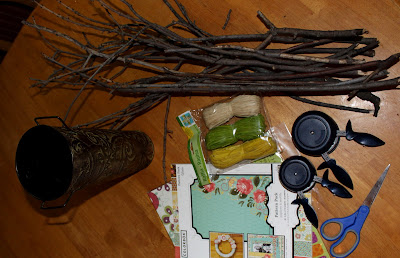
Sticks, vase, scrapbooking paper, twine (we ended up not using it but it was to tie the leafs' on the tree) scallop punch, scissors and hole punch

 
 I explained to him what this tree meant and what it was for. We each wrote 3 things we were thankful for on the leaf. Then he hung the leafs' on the tree.

What are you thankful for?

Hanging up the leaf on the tree

 
When Ashtyn got home he couldn't wait to tell her about it. He calls it the "Thank You Tree" she thought this was pretty awesome too! She wrote a few of her own down on the leafs' and hung them on the tree then went out to play. Not long later a few of the neighbor friends came in with her. Went straight to the counter that the tree was on and they were writing things they were thankful for and hanging them on the tree. My heart was filled with so much joy. What an awesome ministry this has become. Ashtyn was sharing Jesus with them and they were so excited about it!

We have had this tree for a few weeks now and it has been so fun to watch the kids write on the leafs'. The first few days I would ask them during dinner what they were thankful for and then it became a habit. We will be playing or crafting and they will say, Oh I have something to write on a leaf! It's amazing. God is so good and it is so wonderful to see that joy in their hearts too.
This has been the most rewarding project we have done together.
 
Photobucket

Saturday, September 15, 2012

Freezing Apple Pie Filling

Something everyone in our family shares a love for. APPLE PIE. YUM.
This was my first time freezing apple pie filling but it seemed like the logical thing to do since we had such an abundence of apples left over after we canned applesauce.

I was a little nervous since I haven't done this before but just yesterday the kids and I baked our first frozen pie and it turned out so delicious :)

Here is what we (Anna and I) did, we ended up making 18 quarts --> thats 108 apples. WOW.
And... ENJOY IT!! :) 
Photobucket

Monday, September 10, 2012

Canning Applesauce

Unfortunately I was never a big fan of canning anything. So every time my parents were canning I made sure that I was no where to be found. Years later I am really regretting it.
Luckily I have some amazing girl friends who took me under their wing this year and taught me so much and we had such a blast while canning... and a LOT of canning is what we did!
Day #1. Applesauce. *This was one of the things on my Fall Bucket List to check off and we got it accomplished!
Here was the process. (I took LOTS of pictures so I wouldn't forget a single step because this is going to be a yearly tradition for the kids and I from now on).

 
And the best part....

TASTE TESTING!!!! No sugar added to the kids and they ALL loved it!! :)

Anna and I after a hard days work! We canned 12 QUARTS and 8 PINTS of Applesauce!!
 
It isn't as hard as it looks, and it is definitely worth it! :)
 

Photobucket

Friday, September 7, 2012

Ice Cube Paint

We accidentally found a new favorite project... ICE CUBE PAINTING!

Katie and Brayden were painting, I left them alone for just minutes and came back to find this...
They took it upon themselves to get more paint which spilled EVERYWHERE. I mean EVERYWHERE, yes all over them, the chairs and the floor.
 
After I got them cleaned up they headed outside to play while I figured out what to do with this mess.
I left the paint in the ice cube tray because there was SO much in there and had to show Ashtyn when she got home from school (and to show my hubby who didn't believe me when I texted him about this big mess).
Ashtyn got home and thought this was the COOLEST thing EVER. Within a second of looking at the mess she said, "mom put it in the freezer"! What an awesome idea! In the freezer went the tray of paint.
The next day, here is what our kitchen looked like :)
SUPER SUPER FUN!
 
*The next time we do this, I will be the one pouring the paint into the ice cube tray! It also works a little better if you spray a little PAM on the tray!


Photobucket

Fall Bucket List

 Is it really fall already! Where has the time gone?!
We did a summer bucket list- inspired by a friend and our entire family LOVED it! One night during dinner we all talked about things that we would love to do this summer. It was fun checking the things off the list and making memories while we were at it!
So of course...we had to do one for the fall! Here is ours, keep checking back to see the posts of the things we did...aka 'erupting pumkins'! It will be fun!
Feel free to download this or hopefully it will inspire you and your family for fun ideas this fall!
 
Click here to download
Photobucket

Thursday, September 6, 2012

the Marry-Wed Game

Isn't it amazing just how crazy life can get after you get married. The dating and engagement stages we had so much time for each other and we were so in tune with each other, with our wants, needs...just everything. Once you get married, add in careers, real bills and children to the mix how well do you really know your spouse?

It is so important to stay connected to your spouse, the person that you knew so incredibly well when you were dating could have completely changed as life has changed over the last few years!

Here is a fun game to do on a date night with your spouse (you could do this during a quite stay in date night or out to eat)!Print them --> then Fill these out for each other -->Then write your own (truthful) answers down on a separate sheet of paper. You will have so much fun reading the answers and reminiscing old memories!!
This doesn't take long, you will NOT regret playing this game!


Click here to download a FREE printable of the game.

           Enjoy! :)

Photobucket

Monday, August 27, 2012

Chalkboard Frame

 
I finally got one of my projects checked off my list...the chalkboard frame.
This was a lot of fun to make, quick and easy!
Items Needed: 
*FRAME -I purchased the large frame at a
Thrift Store for $2.50
*CHALKBOARD SPRAY PAINT
- Purchased at Menard's (Rust-oleum brand) for $3.90
*SPRAY PAINT- For the frame, purchased at Walmart (Krylon Brand) for $3.84 
 
What To Do:
*Take the back off the frame and remove the glass
*Using the chalkboard paint-spray the wood back
*Spray paint the wooden frame whatever color you choose
(The chalkboard paint dries very quickly, do at least 2 coats and then let dry)
- I also had plenty of spray paint left so I could do another frame! :)
 
And there you go! A super cute inexpensive chalkboard frame for $10.25


Photobucket

Monday, July 16, 2012

Outdoor Movie Theater

.


We have been talking about having a family date night so we decided to do it at home and all outside!
The kids and I put up then tent all by ourselves...that's pretty impressive! Then we got our swing mattress, blankets and pillows and set up our outside bed. After that we dug out the Christmas lights and strung them up around the yard. Of course we couldn't forget the candy and popcorn that Ashtyn put in the little red wagon! And last ... the projector, got it all set up and ready for movie time!

The night started off by our grill out --> yummy stakes and potatoes and of course the kids had to have hot dogs! We ate by our campfire and roasted some s'mores.
Finally it got dark enough to plug in our lights and snuggle up to watch our movie! To my surprise I only saw 1 bat which stayed away and the bugs were scare the entire time! YAHOO!
Once the movie was over we crawled into the tent for a comfy night of sleep.

It is so awesome making memories with our family that will last forever :)

Photobucket

Tuesday, May 8, 2012

Daisy and Her Babies

I FINALLY got the rest of the Tab "Daisy and her Babies" a little updated! So here you go! :)
This summer on 8.8.11 Daisy had her 1st litter of pups 11 of them (unplanned by us). So it was a big suprise, we did lots of research and being a stay at home mommy and wanting to teach the kids some major responsablity we took extereme care of the pups. I kept track of their growth and what we did with them daily, lots of blogging..along with taking HUNDRES of pictures! To view their development click HERE!
I also finally uploaded a little video we got of the puppy birth! :)
Click HERE to watch it! :)
They were such a joy to all of us. We had so much fun caring for and raising these pups!
We are very happy to report that ALL the puppys went to wonderful homes, most in MN but 1 puppy (Ashtyn's favorite who she called 'Princess') went all the way to Washington!
There are a few puppys that are living locally, it is so much fun for us to be able to go see them.
We would LOVE any pictures or updates of the pups from Daisy's 1st litter if you have them :)
You can email them to Heather
Ashtyn with Momma Daisy and 10 of her pups, this picture was taken
just MINUTES before she had her last pup with Ashtyn sitting right next to her!

Monday, May 7, 2012

Marble Run

I attended a child care conference in Sioux Falls this past weekend and got SO MANY aweseome ideas of things to do and make with the kiddos! So of course as soon as I got home I had to try one of the awesome ideas from Jeff Johnson... the MARBLE RUN!
It can be done indoors or outdoors, we chose to do it outdoors (only because thats the only place you will ever find our kiddos)!
It is so inexpensive, SO EASY and so much fun!
My only advice is to let the kids help you build it, or give them tape and let them build and and invent the way they want to make the run themselves (they will amaze you with what they come up with)!

WHAT YOU NEED:
*Pool Noodles (buy @ the dollar tree)
*Tape (Duct Tape works the best but can use packaging tape as well)
*Knife
*Marbles (I bought ours at Hobby Lobby in a bag of 25 for $1.99)


HOW TO MAKE IT:
*Cut the Pool noodle in half the long way (you can also cut the noodle the short way to make tunnels, ect.)
*Use tape and tape the cut pool noodles together --> then tape the noodles to the steps or whenever you want to make your marble run
*Then let the kiddos play!!

Pool Noodle, Marbles and the top of the noodle cut off!

Make little tunnels by cutting off the top of the noodle

Cut the noodle in half

Tape the ends together

Tape down the noodles!

Let them play, figure it out and invent what to do with it!

And let them fix it!!! They will Be SOOO Excited when they figure out how to make it work on their own!

The exitment of figuring out how to fix it! :)

ENJOY!! :)

Photobucket

Monday, April 30, 2012

Never to young to be a Cowboy

I have been going through and cleaning up files on my computer and came across these pictures of the kids. Their love for our horses just melts my heart. I'm SO THANKFUL that our kids can grow up riding and that they love it so much! It's so fun to watch our 3 year old, he just LOVES LOVES LOVES putting on his cowboy hat and his boots no matter where he is going :)


Ashtyn and her horse Punky


Photobucket

Thursday, April 26, 2012

Ashtyn, doing what she loves, Barrel Racing!

The kids and I were watching old videos and I came across this one from last summer. 
Ashtyn (5 years old) barrel racing her horse Punky. He was run in barrels in the PRCA rodeo until he was 6.
I am so proud of my baby girl! Her determination amazes me and he strength and courage just fill me with so much  joy!
Here is a video of her barrel racing at local horse show :)


Photobucket

Sunday, April 22, 2012

Menu Board

I have finally found something that works so great for our family with my weekly menu planning!
These menu boards were SO easy to make and a lot of fun too!
I have really enjoyed doing my weekly menu planning (saves me time and money) and the family enjoys seeing what we will have for dinner. The kids love to put the choices up on the board. They think it is so awesome that they are helping out! :)


What You Need:
Cookie Sheet
Chalkboard Spray Paint (I bought mine at Walmart) * You will only need 1 can
Chalk
Ribbon
Drill & Bit (to drill holes through the top of cookie sheet)
White Card Stock Paper
Scrap booking Paper
Lamenting Paper (I bought the self adhesive sheets at Walmart)
Magnets
Scissors
Glue
Permanent Marker

What to do:
1. Spray paint the inside of the cookie sheet (LET DRY)
2. Print your Menu Selections on the Card Stock Paper
3. Cut out card stock menu items
4. Glue to scrap booking paper and cut out
5. Apply lamenting paper
6. Cut out and use hot glue to attach magnets to the back
7. Use a permanent marker and write the ingredients needed to the back of each Menu item
8. Use the chalk to decorate your boards the way you would like!

We hope you and your family enjoy this as much as we do! :)
Photobucket